There are so many ways of tiying you hair warp. In this tutorial, make sure that the hair warp has a wire in inside. That will help you style it and it'll hold your hair better. For the original post and a DIY tutorial for this hair warp go to Kelly Hicks. The tutorial is easy and won't take a lot of time. Have fun with stylin' your chic handmade headbands.
Monday, 30 July 2012
One Gigantic hat or death by hats? You decide!


Here are (almost) all of my spring vintage hats.
There are many representations from each of the following decades: 1920's - 1960's.
Clementine wanted to have fun too!
I created this post as guest post for Ashley Ording of Fancy Fine.
You Can read her kind words here and more (Im sure lovely) guest posts here
Outfit details:
There are many representations from each of the following decades: 1920's - 1960's.
Clementine wanted to have fun too!
I created this post as guest post for Ashley Ording of Fancy Fine.
You Can read her kind words here and more (Im sure lovely) guest posts here
Outfit details:
Playsuit: 1950s pastel plaid...has matching built in bloomers!!!!
Hat: Late 1940s sun hat with a man riding a bicycle, a horse, a donkey, pineapples,
you name it, its on this hat!
Shoes: I added my own satin ribbons to topshop shoes
Lipstick: Illamasqua
Friday, 27 July 2012
Stylish Side Ponytail
Now that it's hot everyday we all need a simple stylish hairstyle that we can make without using heat. This is a very quick hair tutorial that I've personally made. Actually the first one I made. My sister Anya has been very helpful and agreed to be my model for this post. We hope you'll like it and be surprised how such a wonderful pony can be made in less that 4 min.
Start by moving your hair to the side that has more hair. Tie it into a low ponytail. Note: if your hair has layers, use a few bobby pins to pin the fallen out parts. Pull the elastic down, just enough to make a hole (see picture 4.). Take the rest of your hair and put it in the hole. After that just tight it and style as you want. Pretty simple, ha?
Preparation: tease the back hair on the top of you head. For more volume read the prev. post, or just use a dry shampoo. After you put on the shampoo leave it like that for a few minutes, or you'll be left wit a powdery mess.
Columbia road flower market


The two above were captured by: Helen Cathcart
You can find mor of her work on her website and blog


Instagram:


So Clementine, Morgan Pierre, and I
Scored some heavenly plants at Colombia road.
Made a heavenly picnic in London Fields (Our first london neighborhood)
And walked the Canals until the last it of sunshine was gone.
Photos taken by:
Helen Cathcart, Pierre Eymard, Morgan Bajardi, and myself
Outfit details:
Blouse: Late 1940s with thread stuffed clovers and peter pan collar
Skirt: vintage Casharel
Hat: Early 1960s and late 1950s From Vintage martini
Shoes: Topshop
Purse: Designed and hand made by me Nicole Eymard
Wednesday, 25 July 2012
Voluminous Braided Up-do
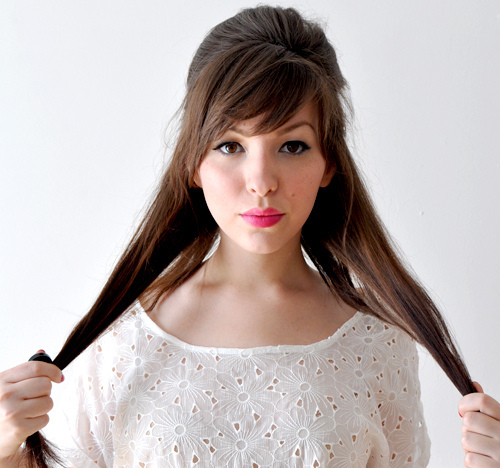
How to get volume to your hair? That's something that I always ask myself because my hair is stick straight and pretty heavy, so curls can't last long. To get more volume the hair must be airy and you must start making volume from the moment you finished washing your hair. I have a tutorial for that - Blow Dry Basics. So after you've done that, head back here and start this amazing braid crown updo. The source of this tutorial is from Keiko Lynn, so for more info on how to make this hairstyle go there.
If your hair needs more texture, you can use a dry shampoo. This will make the teasing past a lot easier.
Spray at your roots, lifting as you go. Wait a minute or two and comb it through of else you'll be left with a powdery mess. Then divide your hair into two sections, like you're doing a half updo. back comb underneath the top half and smooth over the top.
Pin the newly teased section (make sure the top layer is smooth, to cover the mess) with a couple bobby pins. You can give the bump a little boost if you want.
Divide your hair into two sections and braid them. You can tie them using a elastic, or leave them loose.
Pull each braid to the opposite side of you head and pin them in place. You can tuck the ends underneath each braid. And that's it! Have fun!
Subscribe to:
Posts (Atom)